Oracle ERP provides an another offering called BICC - Business Intelligence Cloud Connector to extract the data from Fusion table and publish the data to UCM or OCI Object Storage.
It also provides an option to publish the data to OAC - Oracle Analytics Cloud. BICC contains list of Public View Objects (PVO) which are custom SQL views written to extract the data from Fusion database.
Oracle will keep updating this PVO list and the View Objects as part of each patch updates. We can get the PVO list and corresponding table and column details from an excel sheet published by Oracle. Oracle Link
In this blog I will let you know what all configurations we need to perform to extract and process the data using BICC.
Before we start , we need to have BIACM_ADMIN and BICC_UCM_CONTENT_ADMIN role assigned to our user-id.
- We can access the BICC console using following URL - https://hostinstance.fa.ocs.oraclecloud.com/biacm/
- On the right side , select the settings menu and select "Manage Offerings and Data Stores" to find the predefined offerings (Grouped Entities - SCM, Order Management , HCM etc.).
- Each offering will contain the PVO's related to a particular entity - SCM, HCM etc.
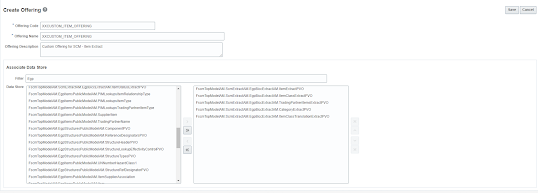
- We can create a custom offering to select specific PVO and group it.
- Select Actions and then select create offering option
- Select the required PVO and create a custom offering.
- We can select and deselect the columns from PVO to restrict the data access.
- We can select the PVO and select "Select Columns" option to select or deselect the column.
- These customizations which we are applying for each PVO can be extracted and imported into other instances.
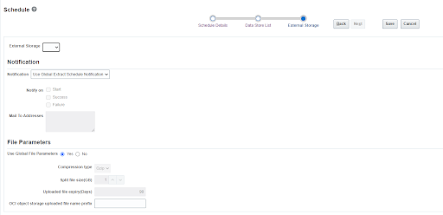
- Select Configure External Storage option to configure UCM , OCI Object Storage and OAC configurations.
- We can specify which storage to use while executing the PVO using BICC webservice.
- We can execute PVO to extract the data using SOAP Service or by scheduling it manually.
- We can use the scheduling option to Schedule the PVO or Submit the Extract manually.
- Use "Manage Extract Schedules" to submit it manually or check the status of the previous runs.
- Select Add action
- Provide a name
- Select the schedule time
- Select Next
- Select the offering
- Select the PVO
- Select the External Storage
- Save the schedule
- Every time when we execute the PVO , it will generate 3 files.
- JSON File : This will hold the execution and output file details.
- Manifest File : This will have the data file details.
- Data File : Actual Data File
- We can execute multiple PVO's together by using Jobs
- We can create Job by giving name and description
- Select the offerings
- Select the PVO's to be executed in parallel
- Save the Job
- Schedule Jobs by using Job Schedule option.


No comments:
Post a Comment